VxLTE Setup
- Introduction
- Tested Setup
- Installation
- Clone Kamailio repository and checkout 5.3 version of repository
- Generate build config files
- Enable MySQL module and all required IMS modules
- Compile and install Kamailio
- Populate MySQL database using kamctlrc command
- Edit /etc/default/rtpproxy file as follows:
- Edit configuration file to fit your requirements for the VoIP platform
- The init.d script
- Create new mysql database for pcscf, scscf and icscf, populate databases and grant permissions to respective users identified by a password
- Copy pcscf, icscf and scscf configuration files to /etc folder and edit accordingly
- Setup the DNS for resolving IMS and EPC components names
- Install RTPEngine
- Running I-CSCF, P-CSCF and S-CSCF as separate process
- Install Open5GS in the same machine as Kamailio IMS - Install Open5GS from source
- Configurations
- Adding Users to HSS and FHoSS
- How to run
- SRTP
You can locate all the necessary materials for the tutorial within this repository.
Introduction
The following content(What is VoLTE?) is from Ericsson. you can aslo read more in Wikipedia.
What is VoLTE?
VoLTE (voice over LTE) is the foundation for evolving mobile voice and communication services for packet switched 4G, Wi-Fi and 5G networks. It is the mainstream mobile network technology for enabling globally interoperable voice and communication services, using IP Multimedia Subsystem (IMS). VoLTE enables high-quality and seamless HD voice services across a multitude of devices like smartphones, smartwatches and enterprise end-points. IMS also enables 5G voice and communication services.
What are the benefits of VoLTE?
- VoLTE enables improved and innovative voice and communication services across smartphones, wearables, smart speakers, other devices and enterprise end-points over LTE, Wi-Fi and 5G networks
- It provides a foundation for improving business and enterprise collaboration services in combination with high-quality mobile voice services
- VoLTE provides telecom grade services for consumers, businesses, enterprises and industries and is deployed with cloud-based solutions
Tested Setup
Host Machine:
$ lsb_release -a
Distributor ID: Ubuntu
Description:    Ubuntu 18.04.6 LTS
Release:        18.04
Codename:       bionic
CPU Info:
$ cat /proc/cpuinfo  | grep 'name'| uniq
model name      : 11th Gen Intel(R) Core(TM) i7-1165G7 @ 2.80GHz
$ cat /proc/cpuinfo  | grep process| wc -l
8
Software Defined Radio (SDR):
- With USB 3.0
- GPS antenna is NOT used.
- 10Mhz GPS-DO is NOT used.
- 1PPS input of USRP open/unused!
- GPS input of USRP open/unused!
Phones:
- Honor 20 (Android)
- Xiamoi
USIM
- Sysmocom USIM - sysmoUSIM-SJS1
Installation
$ sudo apt update
$ sudo apt upgrade
$ sudo apt install -y mysql-server tcpdump screen ntp ntpdate git-core dkms gcc flex bison libmysqlclient-dev make \
libssl-dev libcurl4-openssl-dev libxml2-dev libpcre3-dev bash-completion g++ autoconf rtpproxy libmnl-dev libsctp-dev ipsec-tools libradcli-dev \
libradcli4
Clone Kamailio repository and checkout 5.3 version of repository
$ mkdir -p /usr/local/src/
$ cd /usr/local/src/
$ sudo git clone https://github.com/herlesupreeth/kamailio
$ cd kamailio
$ git checkout -b 5.3 origin/5.3
Generate build config files
$ cd /usr/local/src/kamailio
$ sudo make cfg
Successful build ends as follow:
$ sudo make cfg
.
.
.
make[1]: Leaving directory '/usr/local/src/kamailio/src'
$
Enable MySQL module and all required IMS modules
Edit modules.lst file present at /usr/local/src/kamailio/src with nano (or whatever text editor you prefer):
$ sudo nano /usr/local/src/kamailio/src/modules.lst
The contents of modules.lst should be as follow:
# this file is autogenerated by make modules-cfg

# the list of sub-directories with modules
modules_dirs:=modules

# the list of module groups to compile
cfg_group_include=

# the list of extra modules to compile
include_modules= cdp cdp_avp db_mysql dialplan ims_auth ims_charging ims_dialog ims_diameter_server ims_icscf ims_ipsec_pcscf ims_isc ims_ocs ims_qos ims_registrar_pcscf ims_registrar_scscf ims_usrloc_pcscf ims_usrloc_scscf outbound presence presence_conference presence_dialoginfo presence_mwi presence_profile presence_reginfo presence_xml pua pua_bla pua_dialoginfo pua_reginfo pua_rpc pua_usrloc pua_xmpp sctp tls utils xcap_client xcap_server xmlops xmlrpc

# the list of static modules
static_modules=

# the list of modules to skip from compile list
skip_modules=

# the list of modules to exclude from compile list
exclude_modules= acc_json acc_radius app_java app_lua app_lua_sr app_mono app_perl app_python app_python3 app_ruby auth_ephemeral auth_identity auth_radius cnxcc cplc crypto db2_ldap db_berkeley db_cassandra db_mongodb db_oracle db_perlvdb db_postgres db_redis db_sqlite db_unixodbc dnssec erlang evapi geoip geoip2 gzcompress h350 http_async_client http_client jansson janssonrpcc json jsonrpcc kafka kazoo lcr ldap log_systemd lost memcached misc_radius ndb_cassandra ndb_mongodb ndb_redis nsq osp peering phonenum pua_json rabbitmq regex rls rtp_media_server snmpstats systemdops topos_redis uuid websocket xhttp_pi xmpp $(skip_modules)

modules_all= $(filter-out modules/CVS,$(wildcard modules/*))
modules_noinc= $(filter-out $(addprefix modules/, $(exclude_modules) $(static_modules)), $(modules_all))
modules= $(filter-out $(modules_noinc), $(addprefix modules/, $(include_modules) )) $(modules_noinc)
modules_configured:=1
Compile and install Kamailio
$ cd /usr/local/src/kamailio
$ export RADCLI=1
$ sudo make Q=0 all | tee make_all.txt
Successful build ends as follow:
$ sudo make Q=0 all | tee make_all.txt
.
.
.
make[2]: Leaving directory '/usr/local/src/kamailio/src/modules/counters'
make[1]: Leaving directory '/usr/local/src/kamailio/src'
$
Finally install kamailio as follow:
$ sudo make install | tee make_install.txt
$ sudo ldconfig
The binaries and executable scripts are installed in: /usr/local/sbin: you can check if installation is successful with the following command:
$ ls /usr/local/sbin
... kamailio  kamcmd  kamctl  kamdbctl ...
To be able to use the binaries from command line (from whichever directory you’re in), make sure that /usr/local/sbin is set in PATH environment variable. You can check that with echo $PATH. as follow (You sould be able to see if /usr/local/sbin exists):
$ echo $PATH
... : ... :  /usr/local/sbin: ... : ...
If not and you are using bash, open /root/.bash_profile (sudo nano /root/.bash_profile) and at the end add the following content:
PATH=$PATH:/usr/local/sbin
export PATH
Note that:
-
Kamailio modules are installed at: /usr/local/lib64/kamailio/modules
-
The documentation and readme files are installed at: /usr/local/share/doc/kamailio
-
The configuration files are installed at: /usr/local/etc/kamailio
In case you set the PREFIX variable in make cfg command, then replace /usr/local in all paths above with the value of PREFIX in order to locate the files installed.
Populate MySQL database using kamctlrc command
Edit SIP_DOMAIN and DBENGINE in the /usr/local/etc/kamailio/kamctlrc configuration file (Used by kamctl and kamdbctl tools) as follow:
- open the file withe nano or any editor:
$ sudo nano /usr/local/etc/kamailio/kamctlrc - Add or uncomment(then edit) these parts of the file:
.
.
.
SIP_DOMAIN=ims.mnc001.mcc001.3gppnetwork.org
DBENGINE=MYSQL
.
.
.
Note that SIP_DOMAIN is SIP service domain (or IP address if you don’t have a DNS hostname associated with your SIP service). You can also edit other parts of the file as you want.
Once you are done updating kamctlrc file, run the script to create the database used by Kamailio (When prompted for mysql root user password enter the root password if its is set or else leave it blank i.e. Press Enter):
$ sudo kamdbctl create
check database manually;
$ sudo mysql
<mysql> show databases;
<mysql> use kamailio;
<mysql> show tables;
<mysql> select * from subscriber;
Note that No Subscribers are added yet.
Edit /etc/default/rtpproxy file as follows:
- open rtpproxy file located in /etc/default/rtpproxy as follows:
$ sudo nano /etc/default/rtpproxy
- change the whole file to be like bellow:
# Defaults for rtpproxy

# The control socket.
#CONTROL_SOCK="unix:/var/run/rtpproxy/rtpproxy.sock"
# To listen on an UDP socket, uncomment this line:
#CONTROL_SOCK=udp:127.0.0.1:22222
CONTROL_SOCK=udp:127.0.0.1:7722

# Additional options that are passed to the daemon.
EXTRA_OPTS="-l 172.24.15.30 -d DBUG:LOG_LOCAL0"
where yoou should change 172.24.15.30 with your public IP. To determine your public IP:
$ sudo apt install curl
$ curl icanhazip.com
Your public IP
$
Then run,
$ sudo systemctl restart rtpproxy
Edit configuration file to fit your requirements for the VoIP platform
You have to edit kamailio.cfg located in /usr/local/etc/kamailio/kamailio.cfg configuration file.
Add the follwing lines after #!KAMAILIO line at the top of the config file (kamailio.cfg):
#!define WITH_MYSQL
#!define WITH_AUTH
#!define WITH_USRLOCDB
#!define WITH_NAT
uncomment this line an change it as bellow:
auto_aliases=no
Uncomment this line an uncomment this line and enter the DNS domain created above as bellow:
alias="ims.mnc001.mcc001.3gppnetwork.org"
Uncomment this line (and add another listen=… as bellow), 10.4.128.21 is Your internal IP (Private IP) and 172.24.15.30 is the Public/Floating IP (Public IP).
Depending on your network setup, You should be able to figure out your Private IP and change both values of 10.4.128.21 to your Private IP. Earlier I mentioned how to know your Public IP. change both values of 172.24.15.30 to your Public IP.
listen=udp:10.4.128.21:5060 advertise 172.24.15.30:5060
listen=tcp:10.4.128.21:5060 advertise 172.24.15.30:5060
For my case, it would be like this:
listen=udp:172.30.75.103:5060 advertise 194.225.167.79:5060
listen=tcp:172.30.75.103:5060 advertise 194.225.167.79:5060
Further, we will need to modify the rtpproxy_sock value to match the CONTROL_SOCK option we set for RTPProxy in /etc/default/rtpproxy:
modparam("rtpproxy", "rtpproxy_sock", "udp:127.0.0.1:7722")
The init.d script
The init.d script can be used to start/stop the Kamailio server in a nicer way. A sample of init.d script for Kamailio is provided at:
/usr/local/src/kamailio/pkg/kamailio/deb/debian/kamailio.init Copy the init file into the /etc/init.d/kamailio. Then change the permissions:
$ sudo cp /usr/local/src/kamailio/pkg/kamailio/deb/bionic/kamailio.init /etc/init.d/kamailio
$ sudo chmod 755 /etc/init.d/kamailio
Then edit the /etc/init.d/kamailio file updating the $DAEMON and $CFGFILE values. first open the file like this (or any editor):
$ sudo nano /etc/init.d/kamailio
Then find the follwing variables in the file and change them as bellow:
PATH=/sbin:/bin:/usr/sbin:/usr/bin:/usr/local/sbin
DAEMON=/usr/local/sbin/kamailio
CFGFILE=/usr/local/etc/kamailio/kamailio.cfg
You need to setup a configuration file in the /etc/default/ directory. This file can be found at:
/usr/local/src/kamailio/pkg/kamailio/deb/bionic/kamailio.default
You need to rename the /etc/default/kamailio file to ‘kamailio’ after you’ve copied it. Do this as bellow:
$ sudo cp /usr/local/src/kamailio/pkg/kamailio/deb/bionic/kamailio.default /etc/default/kamailio
Then edit this file (located at: /etc/default/kamailio) and set RUN_KAMAILIO=yes. Edit the other options as per your setup. (as bellow)
- Open the kamailio file located in /etc/default/kamailio with any editor. for example:
$ sudo nano /etc/default/kamailio - Find the following line in the file and uncommnet it.
#RUN_KAMAILIO=yesThen run:
$ sudo systemctl daemon-reload
Create the directory for pid file:
$ sudo mkdir -p /var/run/kamailio
Default setting is to run Kamailio as user kamailio and group kamailio. For that you need to create the user and set ownership
$ sudo adduser --quiet --system --group --disabled-password \
        --shell /bin/false --gecos "Kamailio" \
        --home /var/run/kamailio kamailio

$ sudo chown kamailio:kamailio /var/run/kamailio
Then you can start Kamailio using the following commands:
$ sudo systemctl start kamailio.service
If you have done everything right, you may get an output like this if you get a status:
$ sudo systemctl status kamailio.service
● kamailio.service - LSB: Start the Kamailio SIP proxy server
   Loaded: loaded (/etc/init.d/kamailio; generated)
   Active: active (running) since Tue 2023-03-14 00:10:23 +0330; 5s ago
     Docs: man:systemd-sysv-generator(8)
  Process: 6670 ExecStart=/etc/init.d/kamailio start (code=exited, status=0/SUCCESS)
    Tasks: 24 (limit: 4915)
   CGroup: /system.slice/kamailio.service
           ├─6689 /usr/local/sbin/kamailio -f /usr/local/etc/kamailio/kamailio.cfg -P /var/run/kamailio/kamailio.pid -m 64 -M 8 -u kamailio -g kamailio
           ├─6690 /usr/local/sbin/kamailio -f /usr/local/etc/kamailio/kamailio.cfg -P /var/run/kamailio/kamailio.pid -m 64 -M 8 -u kamailio -g kamailio
           ├─6691 /usr/local/sbin/kamailio -f /usr/local/etc/kamailio/kamailio.cfg -P /var/run/kamailio/kamailio.pid -m 64 -M 8 -u kamailio -g kamailio
           ├─6692 /usr/local/sbin/kamailio -f /usr/local/etc/kamailio/kamailio.cfg -P /var/run/kamailio/kamailio.pid -m 64 -M 8 -u kamailio -g kamailio
           ├─6693 /usr/local/sbin/kamailio -f /usr/local/etc/kamailio/kamailio.cfg -P /var/run/kamailio/kamailio.pid -m 64 -M 8 -u kamailio -g kamailio
           ├─6694 /usr/local/sbin/kamailio -f /usr/local/etc/kamailio/kamailio.cfg -P /var/run/kamailio/kamailio.pid -m 64 -M 8 -u kamailio -g kamailio
           ├─6695 /usr/local/sbin/kamailio -f /usr/local/etc/kamailio/kamailio.cfg -P /var/run/kamailio/kamailio.pid -m 64 -M 8 -u kamailio -g kamailio
           ├─6696 /usr/local/sbin/kamailio -f /usr/local/etc/kamailio/kamailio.cfg -P /var/run/kamailio/kamailio.pid -m 64 -M 8 -u kamailio -g kamailio
           ├─6697 /usr/local/sbin/kamailio -f /usr/local/etc/kamailio/kamailio.cfg -P /var/run/kamailio/kamailio.pid -m 64 -M 8 -u kamailio -g kamailio
           ├─6698 /usr/local/sbin/kamailio -f /usr/local/etc/kamailio/kamailio.cfg -P /var/run/kamailio/kamailio.pid -m 64 -M 8 -u kamailio -g kamailio
           ├─6699 /usr/local/sbin/kamailio -f /usr/local/etc/kamailio/kamailio.cfg -P /var/run/kamailio/kamailio.pid -m 64 -M 8 -u kamailio -g kamailio
           ├─6700 /usr/local/sbin/kamailio -f /usr/local/etc/kamailio/kamailio.cfg -P /var/run/kamailio/kamailio.pid -m 64 -M 8 -u kamailio -g kamailio
           ├─6701 /usr/local/sbin/kamailio -f /usr/local/etc/kamailio/kamailio.cfg -P /var/run/kamailio/kamailio.pid -m 64 -M 8 -u kamailio -g kamailio
           ├─6702 /usr/local/sbin/kamailio -f /usr/local/etc/kamailio/kamailio.cfg -P /var/run/kamailio/kamailio.pid -m 64 -M 8 -u kamailio -g kamailio
           ├─6703 /usr/local/sbin/kamailio -f /usr/local/etc/kamailio/kamailio.cfg -P /var/run/kamailio/kamailio.pid -m 64 -M 8 -u kamailio -g kamailio
           ├─6704 /usr/local/sbin/kamailio -f /usr/local/etc/kamailio/kamailio.cfg -P /var/run/kamailio/kamailio.pid -m 64 -M 8 -u kamailio -g kamailio
           ├─6705 /usr/local/sbin/kamailio -f /usr/local/etc/kamailio/kamailio.cfg -P /var/run/kamailio/kamailio.pid -m 64 -M 8 -u kamailio -g kamailio
           ├─6706 /usr/local/sbin/kamailio -f /usr/local/etc/kamailio/kamailio.cfg -P /var/run/kamailio/kamailio.pid -m 64 -M 8 -u kamailio -g kamailio
           ├─6707 /usr/local/sbin/kamailio -f /usr/local/etc/kamailio/kamailio.cfg -P /var/run/kamailio/kamailio.pid -m 64 -M 8 -u kamailio -g kamailio
           ├─6708 /usr/local/sbin/kamailio -f /usr/local/etc/kamailio/kamailio.cfg -P /var/run/kamailio/kamailio.pid -m 64 -M 8 -u kamailio -g kamailio
           ├─6709 /usr/local/sbin/kamailio -f /usr/local/etc/kamailio/kamailio.cfg -P /var/run/kamailio/kamailio.pid -m 64 -M 8 -u kamailio -g kamailio
           ├─6710 /usr/local/sbin/kamailio -f /usr/local/etc/kamailio/kamailio.cfg -P /var/run/kamailio/kamailio.pid -m 64 -M 8 -u kamailio -g kamailio
           ├─6711 /usr/local/sbin/kamailio -f /usr/local/etc/kamailio/kamailio.cfg -P /var/run/kamailio/kamailio.pid -m 64 -M 8 -u kamailio -g kamailio
           └─6712 /usr/local/sbin/kamailio -f /usr/local/etc/kamailio/kamailio.cfg -P /var/run/kamailio/kamailio.pid -m 64 -M 8 -u kamailio -g kamailio

مارس 14 00:10:23 5gl kamailio[6670]:              *: ims.mnc001.mcc001.3gppnetwork.org:*
مارس 14 00:10:23 5gl /usr/local/sbin/kamailio[6689]: INFO: rr [../outbound/api.h:52]: ob_load_api(): unable to import bind_ob - maybe module is not loaded
مارس 14 00:10:23 5gl /usr/local/sbin/kamailio[6689]: INFO: rr [rr_mod.c:177]: mod_init(): outbound module not available
مارس 14 00:10:23 5gl /usr/local/sbin/kamailio[6689]: INFO: <core> [main.c:2779]: main(): processes (at least): 24 - shm size: 67108864 - pkg size: 8388608
مارس 14 00:10:23 5gl /usr/local/sbin/kamailio[6689]: INFO: <core> [core/udp_server.c:154]: probe_max_receive_buffer(): SO_RCVBUF is initially 212992
مارس 14 00:10:23 5gl /usr/local/sbin/kamailio[6689]: INFO: <core> [core/udp_server.c:206]: probe_max_receive_buffer(): SO_RCVBUF is finally 425984
مارس 14 00:10:23 5gl /usr/local/sbin/kamailio[6702]: INFO: jsonrpcs [jsonrpcs_sock.c:443]: jsonrpc_dgram_process(): a new child 0/6702
مارس 14 00:10:23 5gl /usr/local/sbin/kamailio[6703]: INFO: ctl [io_listener.c:214]: io_listen_loop(): io_listen_loop:  using epoll_lt io watch method (config)
مارس 14 00:10:23 5gl kamailio[6670]:    ...done.
مارس 14 00:10:23 5gl systemd[1]: Started LSB: Start the Kamailio SIP proxy server.
You can also check everything is right with the following command:
$ sudo ps axw | egrep kamailio
 6689 ?        S      0:00 /usr/local/sbin/kamailio -f /usr/local/etc/kamailio/kamailio.cfg -P /var/run/kamailio/kamailio.pid -m 64 -M 8 -u kamailio -g kamailio
 6690 ?        S      0:00 /usr/local/sbin/kamailio -f /usr/local/etc/kamailio/kamailio.cfg -P /var/run/kamailio/kamailio.pid -m 64 -M 8 -u kamailio -g kamailio
 6691 ?        S      0:00 /usr/local/sbin/kamailio -f /usr/local/etc/kamailio/kamailio.cfg -P /var/run/kamailio/kamailio.pid -m 64 -M 8 -u kamailio -g kamailio
 6692 ?        S      0:00 /usr/local/sbin/kamailio -f /usr/local/etc/kamailio/kamailio.cfg -P /var/run/kamailio/kamailio.pid -m 64 -M 8 -u kamailio -g kamailio
 6693 ?        S      0:00 /usr/local/sbin/kamailio -f /usr/local/etc/kamailio/kamailio.cfg -P /var/run/kamailio/kamailio.pid -m 64 -M 8 -u kamailio -g kamailio
 6694 ?        S      0:00 /usr/local/sbin/kamailio -f /usr/local/etc/kamailio/kamailio.cfg -P /var/run/kamailio/kamailio.pid -m 64 -M 8 -u kamailio -g kamailio
 6695 ?        S      0:00 /usr/local/sbin/kamailio -f /usr/local/etc/kamailio/kamailio.cfg -P /var/run/kamailio/kamailio.pid -m 64 -M 8 -u kamailio -g kamailio
 6696 ?        S      0:00 /usr/local/sbin/kamailio -f /usr/local/etc/kamailio/kamailio.cfg -P /var/run/kamailio/kamailio.pid -m 64 -M 8 -u kamailio -g kamailio
 6697 ?        S      0:00 /usr/local/sbin/kamailio -f /usr/local/etc/kamailio/kamailio.cfg -P /var/run/kamailio/kamailio.pid -m 64 -M 8 -u kamailio -g kamailio
 6698 ?        S      0:00 /usr/local/sbin/kamailio -f /usr/local/etc/kamailio/kamailio.cfg -P /var/run/kamailio/kamailio.pid -m 64 -M 8 -u kamailio -g kamailio
 6699 ?        S      0:00 /usr/local/sbin/kamailio -f /usr/local/etc/kamailio/kamailio.cfg -P /var/run/kamailio/kamailio.pid -m 64 -M 8 -u kamailio -g kamailio
 6700 ?        S      0:00 /usr/local/sbin/kamailio -f /usr/local/etc/kamailio/kamailio.cfg -P /var/run/kamailio/kamailio.pid -m 64 -M 8 -u kamailio -g kamailio
 6701 ?        S      0:00 /usr/local/sbin/kamailio -f /usr/local/etc/kamailio/kamailio.cfg -P /var/run/kamailio/kamailio.pid -m 64 -M 8 -u kamailio -g kamailio
 6702 ?        S      0:00 /usr/local/sbin/kamailio -f /usr/local/etc/kamailio/kamailio.cfg -P /var/run/kamailio/kamailio.pid -m 64 -M 8 -u kamailio -g kamailio
 6703 ?        S      0:00 /usr/local/sbin/kamailio -f /usr/local/etc/kamailio/kamailio.cfg -P /var/run/kamailio/kamailio.pid -m 64 -M 8 -u kamailio -g kamailio
 6704 ?        S      0:00 /usr/local/sbin/kamailio -f /usr/local/etc/kamailio/kamailio.cfg -P /var/run/kamailio/kamailio.pid -m 64 -M 8 -u kamailio -g kamailio
 6705 ?        S      0:00 /usr/local/sbin/kamailio -f /usr/local/etc/kamailio/kamailio.cfg -P /var/run/kamailio/kamailio.pid -m 64 -M 8 -u kamailio -g kamailio
 6706 ?        S      0:00 /usr/local/sbin/kamailio -f /usr/local/etc/kamailio/kamailio.cfg -P /var/run/kamailio/kamailio.pid -m 64 -M 8 -u kamailio -g kamailio
 6707 ?        S      0:00 /usr/local/sbin/kamailio -f /usr/local/etc/kamailio/kamailio.cfg -P /var/run/kamailio/kamailio.pid -m 64 -M 8 -u kamailio -g kamailio
 6708 ?        S      0:00 /usr/local/sbin/kamailio -f /usr/local/etc/kamailio/kamailio.cfg -P /var/run/kamailio/kamailio.pid -m 64 -M 8 -u kamailio -g kamailio
 6709 ?        S      0:00 /usr/local/sbin/kamailio -f /usr/local/etc/kamailio/kamailio.cfg -P /var/run/kamailio/kamailio.pid -m 64 -M 8 -u kamailio -g kamailio
 6710 ?        S      0:00 /usr/local/sbin/kamailio -f /usr/local/etc/kamailio/kamailio.cfg -P /var/run/kamailio/kamailio.pid -m 64 -M 8 -u kamailio -g kamailio
 6711 ?        S      0:00 /usr/local/sbin/kamailio -f /usr/local/etc/kamailio/kamailio.cfg -P /var/run/kamailio/kamailio.pid -m 64 -M 8 -u kamailio -g kamailio
 6712 ?        S      0:00 /usr/local/sbin/kamailio -f /usr/local/etc/kamailio/kamailio.cfg -P /var/run/kamailio/kamailio.pid -m 64 -M 8 -u kamailio -g kamailio
 6852 pts/2    S+     0:00 grep -E --color=auto kamailio
Create new mysql database for pcscf, scscf and icscf, populate databases and grant permissions to respective users identified by a password
First, do the steps bellow in mysql environment:
$ sudo mysql
mysql> CREATE DATABASE  `pcscf`;
mysql> CREATE DATABASE  `scscf`;
mysql> CREATE DATABASE  `icscf`;
mysql> exit
In all of the below steps, when prompted for mysql root user password, leave it blank i.e. Press Enter:
$ cd /usr/local/src/kamailio/utils/kamctl/mysql
$ sudo mysql -u root -p pcscf < standard-create.sql
$ sudo mysql -u root -p pcscf < presence-create.sql
$ sudo mysql -u root -p pcscf < ims_usrloc_pcscf-create.sql
$ sudo mysql -u root -p pcscf < ims_dialog-create.sql

$ sudo mysql -u root -p scscf < standard-create.sql
$ sudo mysql -u root -p scscf < presence-create.sql
$ sudomysql -u root -p scscf < ims_usrloc_scscf-create.sql
$ sudo mysql -u root -p scscf < ims_dialog-create.sql
$ sudo mysql -u root -p scscf < ims_charging-create.sql

$ cd /usr/local/src/kamailio/misc/examples/ims/icscf
$ sudo mysql -u root -p icscf < icscf.sql
You can Verify that following tables are present in respective databases (for example for pcscf) by logging into mysql.
$ sudo mysql
mysql> show databases;
+--------------------+
| Database           |
+--------------------+
| information_schema |
| icscf              |
| kamailio           |
| mysql              |
| pcscf              |
| performance_schema |
| scscf              |
| sys                |
+--------------------+
8 rows in set (0.00 sec)
mysql> use pcscf;
Reading table information for completion of table and column names
You can turn off this feature to get a quicker startup with -A

Database changed
mysql> show tables;
+-----------------+
| Tables_in_pcscf |
+-----------------+
| active_watchers |
| dialog_in       |
| dialog_out      |
| dialog_vars     |
| location        |
| presentity      |
| pua             |
| version         |
| watchers        |
| xcap            |
+-----------------+
10 rows in set (0.00 sec)
mysql> exit
Bye
You can do the same for other databses (icscf and scscf) as above (better to check if everything is alright) . Then, repeat following steps:
NOTE: Do not copy/paste Query OK, 0 rows affected, 1 warning (0.00 sec) !!!
$ sudo mysql
mysql> grant delete,insert,select,update on pcscf.* to pcscf@localhost identified by 'heslo';
Query OK, 0 rows affected, 1 warning (0.00 sec) (you should get back this if everything is ok)
mysql> grant delete,insert,select,update on scscf.* to scscf@localhost identified by 'heslo';
Query OK, 0 rows affected, 1 warning (0.00 sec)
mysql> grant delete,insert,select,update on icscf.* to icscf@localhost identified by 'heslo';
Query OK, 0 rows affected, 1 warning (0.00 sec)
mysql> grant delete,insert,select,update on icscf.* to provisioning@localhost identified by 'provi';
Query OK, 0 rows affected, 1 warning (0.00 sec)
mysql> GRANT ALL PRIVILEGES ON pcscf.* TO 'pcscf'@'%' identified by 'heslo';
Query OK, 0 rows affected, 1 warning (0.00 sec)
mysql> GRANT ALL PRIVILEGES ON scscf.* TO 'scscf'@'%' identified by 'heslo';
Query OK, 0 rows affected, 1 warning (0.00 sec)
mysql> GRANT ALL PRIVILEGES ON icscf.* TO 'icscf'@'%' identified by 'heslo';
Query OK, 0 rows affected, 1 warning (0.01 sec)
mysql> GRANT ALL PRIVILEGES ON icscf.* TO 'provisioning'@'%' identified by 'provi';
Query OK, 0 rows affected, 1 warning (0.00 sec)
mysql> FLUSH PRIVILEGES;
Query OK, 0 rows affected (0.00 sec)
mysql> exit
Bye
Then:
$ sudo mysql
mysql> use icscf;
mysql> INSERT INTO `nds_trusted_domains` VALUES (1,'ims.mnc001.mcc001.3gppnetwork.org');
mysql> INSERT INTO `s_cscf` VALUES (1,'First and only S-CSCF','sip:scscf.ims.mnc001.mcc001.3gppnetwork.org:6060');
mysql> INSERT INTO `s_cscf_capabilities` VALUES (1,1,0),(2,1,1);
mysql> exit
Copy pcscf, icscf and scscf configuration files to /etc folder and edit accordingly
$ cd ~ && git clone https://github.com/herlesupreeth/Kamailio_IMS_Config
$ cd Kamailio_IMS_Config
$ cp -r kamailio_icscf /etc
$ cp -r kamailio_pcscf /etc
$ cp -r kamailio_scscf /etc
Setup the DNS for resolving IMS and EPC components names
First:
$ sudo apt install -y bind9
Then:
$ cd /etc/bind
Then create an new file with:
$ sudo nano ims.mnc001.mcc001.3gppnetwork.org
Copy/paste content in bellow box and save the file:
NOTE
Change the all the 172.30.75.103 IPs to your local (Private) IP!
$ORIGIN ims.mnc001.mcc001.3gppnetwork.org.
$TTL 1W
@                       1D IN SOA       localhost. root.localhost. (
                                        1               ; serial
                                        3H              ; refresh
                                        15M             ; retry
                                        1W              ; expiry
                                        1D )            ; minimum

                        1D IN NS        ns
ns                      1D IN A         172.30.75.103

pcscf                   1D IN A         172.30.75.103
_sip._udp.pcscf         1D SRV 0 0 5060 pcscf
_sip._tcp.pcscf         1D SRV 0 0 5060 pcscf

icscf                   1D IN A         172.30.75.103
_sip._udp               1D SRV 0 0 4060 icscf
_sip._tcp               1D SRV 0 0 4060 icscf

scscf                   1D IN A         172.30.75.103
_sip._udp.scscf         1D SRV 0 0 6060 scscf
_sip._tcp.scscf         1D SRV 0 0 6060 scscf

hss                     1D IN A         172.30.75.103
NOTE
Above example DNS Zone file creates a DNS Zone file into the bind folder.
We will create another DNS zone for resolving pcrf domain as follows:
$ cd /etc/bind
Then create an new file with:
$ sudo nano epc.mnc001.mcc001.3gppnetwork.org
Copy/paste content in bellow box and save the file:
NOTE
Change the all the 172.30.75.103 IPs to your local (Private) IP!
$ORIGIN epc.mnc001.mcc001.3gppnetwork.org.
$TTL 1W
@                       1D IN SOA       localhost. root.localhost. (
                                        1               ; serial
                                        3H              ; refresh
                                        15M             ; retry
                                        1W              ; expiry
                                        1D )            ; minimum

                        1D IN NS        epcns
epcns                   1D IN A         172.30.75.103

pcrf                    1D IN A         127.0.0.5
NOTE
Also note that according to this DNS zone file, PCRF (a component in open5gs project) must have IP address of 127.0.0.5! (we later config it that way)
Then edit /etc/bind/named.conf.local file as follows (the whole content of the file should be as follows):
//
// Do any local configuration here
//

// Consider adding the 1918 zones here, if they are not used in your
// organization
//include "/etc/bind/zones.rfc1918";

zone "ims.mnc001.mcc001.3gppnetwork.org" {
        type master;
        file "/etc/bind/ims.mnc001.mcc001.3gppnetwork.org";
};

zone "epc.mnc001.mcc001.3gppnetwork.org" {
        type master;
        file "/etc/bind/epc.mnc001.mcc001.3gppnetwork.org";
};
And finally edit /etc/bind/named.conf.options file as follows (the whole content of the file should be as follows):
options {
        directory "/var/cache/bind";

        // If there is a firewall between you and nameservers you want
        // to talk to, you may need to fix the firewall to allow multiple
        // ports to talk.  See http://www.kb.cert.org/vuls/id/800113

        // If your ISP provided one or more IP addresses for stable
        // nameservers, you probably want to use them as forwarders.
        // Uncomment the following block, and insert the addresses replacing
        // the all-0's placeholder.

        //forwarders {
        // Put here the IP address of other DNS server which could be used if name cannot be resolved with DNS server running in this machine (Optional)
        //10.4.128.2;
        //};

        //========================================================================
        // If BIND logs error messages about the root key being expired,
        // you will need to update your keys.  See https://www.isc.org/bind-keys
        //========================================================================
        dnssec-validation no;
        allow-query { any; };

        auth-nxdomain no;    # conform to RFC1035
        //listen-on-v6 { any; };
};
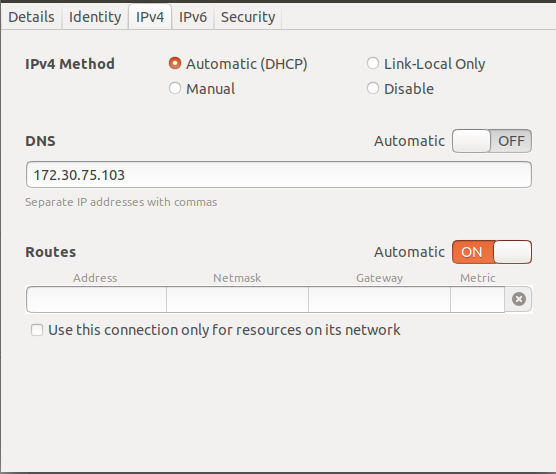
Now go to your connection setting and turn off Automatic DNS setting and just fill it with your Private IP (for my case is 172.30.75.103).
NOTE
Don’t forget to change 172.30.75.103 to your Private IP.
Then:
$ sudo systemctl restart bind9
Add following entries on top of all other entries in /etc/resolv.conf (make sure it persist across reboots (Google how!)):
NOTE
make sure to change 172.30.75.103 IP to your Private IP!
search ims.mnc001.mcc001.3gppnetwork.org
nameserver 172.30.75.103
Finally, do the following step to make sure if dns is working:
$ nslookup pcscf.ims.mnc001.mcc001.3gppnetwork.org
you should get a result like this (except that your Private IP is defferent):
$ nslookup pcscf.ims.mnc001.mcc001.3gppnetwork.org
Server:         172.30.75.103
Address:        172.30.75.103#53

Name:   pcscf.ims.mnc001.mcc001.3gppnetwork.org
Address: 172.30.75.103
Install RTPEngine
$ export DEB_BUILD_PROFILES="pkg.ngcp-rtpengine.nobcg729"
$ sudo apt install dpkg-dev
$ cd ~
$ git clone https://github.com/sipwise/rtpengine
$ cd rtpengine && git checkout mr7.4.1
Then:
$ dpkg-checkbuilddeps
The above command checks for dependencies and give you a list of dependencies which are missing in the system. The below list is the result of this command and we will install them:
sudo apt install debhelper default-libmysqlclient-dev gperf iptables-dev libavcodec-dev libavfilter-dev libavformat-dev libavutil-dev libbencode-perl libcrypt-openssl-rsa-perl libcrypt-rijndael-perl libdigest-crc-perl libdigest-hmac-perl libevent-dev libhiredis-dev libio-multiplex-perl libio-socket-inet6-perl libiptc-dev libjson-glib-dev libnet-interface-perl libpcap0.8-dev libsocket6-perl libspandsp-dev libswresample-dev libsystemd-dev libxmlrpc-core-c3-dev markdown dkms module-assistant keyutils libnfsidmap2 libtirpc1 nfs-common rpcbind
After installing dependencies run the below command again and verify that no dependencies are left out. This should just return back to shell with no output if all depedencies are met.
$ dpkg-checkbuilddeps
$
Then:
$ dpkg-buildpackage -uc -us
successful build end like tios:
$ dpkg-buildpackage -uc -us
.
.
.
dpkg-source: info: using options from rtpengine/debian/source/options: --extend-diff-ignore=.gitreview
dpkg-buildpackage: info: full upload; Debian-native package (full source is included)
then:
$ cd ..
and:
$ sudo dpkg -i *.deb
Successful installation ends with like this:
$ sudo dpkg -i *.deb
.
.
.
Setting up ngcp-rtpengine-kernel-source (7.4.1.7+0~mr7.4.1.7) ...
Setting up ngcp-rtpengine-recording-daemon (7.4.1.7+0~mr7.4.1.7) ...
Setting up ngcp-rtpengine-utils (7.4.1.7+0~mr7.4.1.7) ...
Setting up ngcp-rtpengine (7.4.1.7+0~mr7.4.1.7) ...
Processing triggers for systemd (237-3ubuntu10.57) ...
Processing triggers for ureadahead (0.100.0-21) ...
Processing triggers for man-db (2.8.3-2ubuntu0.1) ...
$
Then, run:
$ sudo cp /etc/rtpengine/rtpengine.sample.conf /etc/rtpengine/rtpengine.conf
Then open the config file located at: /etc/rtpengine/rtpengine.conf. Edit this file as follows under [rtpengine] section:
NOTE
Don’t forget to change 172.30.75.103 to your Private IP.
interface = 172.30.75.103
Then open /etc/default/ngcp-rtpengine-daemon config file and edit the following line to be yes:
RUN_RTPENGINE=yes
Also edit /etc/default/ngcp-rtpengine-recording-daemon config file:
RUN_RTPENGINE_RECORDING=yes
Finally:
$ sudo cp /etc/rtpengine/rtpengine-recording.sample.conf /etc/rtpengine/rtpengine-recording.conf
$ sudo mkdir /var/spool/rtpengine
$ sudo systemctl restart ngcp-rtpengine-daemon.service ngcp-rtpengine-recording-daemon.service ngcp-rtpengine-recording-nfs-mount.service
$ sudo systemctl enable ngcp-rtpengine-daemon.service ngcp-rtpengine-recording-daemon.service ngcp-rtpengine-recording-nfs-mount.service
$ systemctl stop rtpproxy
$ systemctl disable rtpproxy
$ systemctl mask rtpproxy
Running I-CSCF, P-CSCF and S-CSCF as separate process
First, stop the default kamailio SIP server:
$ sudo systemctl stop kamailio
$ sudo systemctl disable kamailio
$ sudo systemctl mask kamailio
There are some chnages that you shoul make that original document from open5gs hasn’t mentioned them.
NOTE
In order to make everything work, YOU **MUST do following steps in a correct way.**
- Changes in PCSCF:
- Open /etc/kamailio_pcscf location with root access. one way to do so is:
$ sudo nautilus /etc/kamailio_pcscf - You can see several config files:
$ ls /etc/kamailio_pcscf/ dispatcher.list kamailio_pcscf.cfg pcscf.cfg pcscf.xml README.md route sems tls.cfg - Open pcscf.cfg and pcscf.xml files and replace all 10.4.128.21 to your Private IP (which in my case is 172.30.75.103)
- Open /etc/kamailio_pcscf location with root access. one way to do so is:
- Changes in SCSCF:
- Open /etc/kamailio_scscf location with root access. one way to do so is:
$ sudo nautilus /etc/kamailio_scscf - Open scscf.cfg and scscf.xml files and replace all 10.4.128.21 to your Private IP (which in my case is 172.30.75.103)
- Open /etc/kamailio_scscf location with root access. one way to do so is:
- Changes in ICSCF:
- Open /etc/kamailio_icscf location with root access. one way to do so is:
$ sudo nautilus /etc/kamailio_icscf - Open icscf.cfg and icscf.xml files and replace all 10.4.128.21 to your Private IP (which in my case is 172.30.75.103)
- Open /etc/kamailio_icscf location with root access. one way to do so is:
From now on you should be able to have multiple terminals open. To handle everything easily. I recommand Tmux.
Let’s run kamailio stuff
- Running PCSCF:
- Open a terminal
- Then:
 $ sudo -i
 # mkdir -p /var/run/kamailio_pcscf
NOTE
You have to repeat step above everytime you restart your computer in order to run pcscf as bellow * Finally run pcscf as separate process:
# kamailio -f /etc/kamailio_pcscf/kamailio_pcscf.cfg -P /kamailio_pcscf.pid -DD -E -e* *For now*, a successful running of PCSCF should iclude some lines like this: ``` console # kamailio -f /etc/kamailio_pcscf/kamailio_pcscf.cfg -P /kamailio_pcscf.pid -DD -E -e . . . 0(4551) ERROR: <script>: event_route[htable:mod-init] . . . . 96(6589) INFO: cdp [peerstatemachine.c:526]: I_Snd_Conn_Req(): I_Snd_Conn_Req(): Peer pcrf.epc.mnc001.mcc001.3gppnetwork.org 96(6589) INFO: cdp [receiver.c:874]: peer_connect(): peer_connect(): Trying to connect to 127.0.0.5 port 3868 96(6589) ERROR: cdp [receiver.c:922]: peer_connect(): peer_connect(): Error opening connection to to 127.0.0.5 port 3868 >Connection refused 95(6587) INFO: cdp [acceptor.c:81]: acceptor_process(): Acceptor process starting up... 95(6587) WARNING: cdp [tcp_accept.c:120]: create_socket(): create_socket(): Trying to open/bind/listen on 172.30.75.103 port 3871 95(6587) WARNING: cdp [tcp_accept.c:145]: create_socket(): create_socket(): Successful socket open/bind/listen on 172.30.75.103 port 3871 . . . . 98(4761) ERROR: <script>: Preloading NAT-PING. Rows: 0 . . . ``` * In order to make VoLTE work, This process should be running. But whenever wanted to close the process you can hit ctrl + c : ```console # kamailio -f /etc/kamailio_pcscf/kamailio_pcscf.cfg -P /kamailio_pcscf.pid -DD -E -e . . . ^C # ``` - Running SCSCF:
- Open a terminal
- Then:
 $ sudo -i
 # mkdir -p /var/run/kamailio_scscf
NOTE
You have to repeat step above everytime you restart your computer in order to run pcscf as bellow * Finally run pcscf as separate process:
# kamailio -f /etc/kamailio_scscf/kamailio_scscf.cfg -P /kamailio_scscf.pid -DD -E -e* *For now*, a successful running of SCSCF should iclude some lines like this: ```console # kamailio -f /etc/kamailio_scscf/kamailio_scscf.cfg -P /kamailio_scscf.pid -DD -E -e . . . 19(6702) INFO: cdp [worker.c:332]: worker_process(): [10] Worker process started... 26(6719) INFO: cdp [receiver.c:454]: receiver_process(): receiver_process(): [hss.ims.mnc001.mcc001.3gppnetwork.org] Receiver process doing init on new process... 26(6719) INFO: cdp [receiver.c:186]: add_serviced_peer(): add_serviced_peer(): Adding serviced_peer_t to receiver for peer [hss.ims.mnc001.mcc001.3gppnetwork.org] 26(6719) INFO: cdp [receiver.c:459]: receiver_process(): receiver_process(): [hss.ims.mnc001.mcc001.3gppnetwork.org] Receiver process starting up... 27(6722) INFO: cdp [acceptor.c:81]: acceptor_process(): Acceptor process starting up... 27(6722) WARNING: cdp [tcp_accept.c:120]: create_socket(): create_socket(): Trying to open/bind/listen on 172.30.75.103 port 3870 27(6722) WARNING: cdp [tcp_accept.c:145]: create_socket(): create_socket(): Successful socket open/bind/listen on 172.30.75.103 port 3870 27(6722) INFO: cdp [acceptor.c:95]: acceptor_process(): Acceptor opened sockets. Entering accept loop ... 28(6723) INFO: cdp [peerstatemachine.c:526]: I_Snd_Conn_Req(): I_Snd_Conn_Req(): Peer hss.ims.mnc001.mcc001.3gppnetwork.org 28(6723) INFO: cdp [receiver.c:874]: peer_connect(): peer_connect(): Trying to connect to 172.30.75.103 port 3868 28(6723) ERROR: cdp [receiver.c:922]: peer_connect(): peer_connect(): Error opening connection to to 172.30.75.103 port 3868 >Connection refused . . .
#
* In order to make VoLTE work, This process should be running. But whenever wanted to close
  the process you can hit ctrl + c :
  ``` console
  # kamailio -f /etc/kamailio_scscf/kamailio_scscf.cfg -P /kamailio_scscf.pid -DD -E -e
   .
   .
   .
   ^C
  #
- Running ICSCF:
- Open a terminal
- Then:
 $ sudo -i
 # mkdir -p /var/run/kamailio_icscf
NOTE
You have to repeat step above everytime you restart your computer in order to run pcscf as bellow * Finally run pcscf as separate process:
# kamailio -f /etc/kamailio_icscf/kamailio_icscf.cfg -P /kamailio_icscf.pid -DD -E -e* *For now*, a successful running of ICSCF should iclude some lines like this: ```console # kamailio -f /etc/kamailio_icscf/kamailio_icscf.cfg -P /kamailio_icscf.pid -DD -E -e . . . 26(6946) INFO: cdp [receiver.c:459]: receiver_process(): receiver_process(): [hss.ims.mnc001.mcc001.3gppnetwork.org] Receiver process starting up... 27(6947) INFO: cdp [acceptor.c:81]: acceptor_process(): Acceptor process starting up... 27(6947) WARNING: cdp [tcp_accept.c:120]: create_socket(): create_socket(): Trying to open/bind/listen on 172.30.75.103 port 3869 28(6948) INFO: cdp [timer.c:205]: timer_process(): Timer process starting up... 27(6947) WARNING: cdp [tcp_accept.c:145]: create_socket(): create_socket(): Successful socket open/bind/listen on 172.30.75.103 port 3869 27(6947) INFO: cdp [acceptor.c:95]: acceptor_process(): Acceptor opened sockets. Entering accept loop ... 30(6950) INFO: jsonrpcs [jsonrpcs_sock.c:443]: jsonrpc_dgram_process(): a new child 0/6950 28(6948) INFO: cdp [peerstatemachine.c:526]: I_Snd_Conn_Req(): I_Snd_Conn_Req(): Peer hss.ims.mnc001.mcc001.3gppnetwork.org 28(6948) INFO: cdp [receiver.c:874]: peer_connect(): peer_connect(): Trying to connect to 172.30.75.103 port 3868 28(6948) ERROR: cdp [receiver.c:922]: peer_connect(): peer_connect(): Error opening connection to to 172.30.75.103 port 3868 >Connection refused . . . # ``` * In order to make VoLTE work, This process should be running. But whenever wanted to close the process you can hit ctrl + c : ``` console # kamailio -f /etc/kamailio_scscf/kamailio_scscf.cfg -P /kamailio_scscf.pid -DD -E -e . . . ^C # ```
Install Open5GS in the same machine as Kamailio IMS - Install Open5GS from source
Getting MongoDB
Import the public key used by the package management system.
$ wget -qO - https://www.mongodb.org/static/pgp/server-6.0.asc | sudo apt-key add -
$ echo "deb [ arch=amd64,arm64 ] https://repo.mongodb.org/apt/ubuntu bionic/mongodb-org/6.0 multiverse" | sudo tee /etc/apt/sources.list.d/mongodb-org-6.0.list
$ sudo apt-get update
$ sudo apt-get install -y mongodb-org
Then:
$ sudo systemctl start mongod
And then (ensure to automatically start it on system boot–> Google how!):
$ sudo systemctl enable mongod
Setting up TUN device (not persistent after rebooting)
Create the TUN device with the interface name ogstun3:
$ sudo ip tuntap add name ogstun mode tun
$ sudo ip addr add 10.45.0.1/16 dev ogstun
$ sudo ip addr add 2001:db8:cafe::1/48 dev ogstun
$ sudo ip link set ogstun up
Building Open5GS
Install the dependencies for building the source code:
$ sudo apt install python3-pip python3-setuptools python3-wheel ninja-build build-essential flex bison git cmake libsctp-dev libgnutls28-dev libgcrypt-dev libssl-dev libidn11-dev libmongoc-dev libbson-dev libyaml-dev libnghttp2-dev libmicrohttpd-dev libcurl4-gnutls-dev libnghttp2-dev libtins-dev libtalloc-dev meson
Then clone the repo. :
$ cd ~
$ git clone https://github.com/open5gs/open5gs
To compile with meson:
$ cd open5gs
$ meson build --prefix=`pwd`/install
$ ninja -C build
Check whether the compilation is correct:
$ cd ~/open5gs
$ ./build/tests/attach/attach ## EPC Only
$ ./build/tests/registration/registration ## 5G Core Only
Run all test
$ cd ~/open5gs/build
$ meson test -v
You need to perform the installation process.
$ cd ~/open5gs/build
$ ninja install
Install and Setup FoHSS
install Java JDK
Download Oracle Java 7 JDK from following link using a browser:
https://www.oracle.com/technetwork/java/javase/downloads/java-archive-downloads-javase7-521261.html
Change directory to wherever you have downloaded the file.
Downloaded file name should be: jdk-7u79-linux-x64.tar.gz
NOTE: use sudo wherever needed:
$ mkdir -p  /usr/lib/jvm/
path-to-downloaded file$ tar -zxf jdk-7u79-linux-x64.tar.gz -C /usr/lib/jvm/
Now:
$ update-alternatives --install /usr/bin/java java /usr/lib/jvm/jdk1.7.0_79/bin/java 100
$ update-alternatives --install /usr/bin/javac javac /usr/lib/jvm/jdk1.7.0_79/bin/javac 100
Configure Java version:
$ update-alternatives --display java
java - auto mode
  link best version is /usr/lib/jvm/jdk1.7.0_79/bin/java
  link currently points to /usr/lib/jvm/jdk1.7.0_79/bin/java
  link java is /usr/bin/java
/usr/lib/jvm/jdk1.7.0_79/bin/java - priority 100

$ update-alternatives --display javac
javac - auto mode
  link best version is /usr/lib/jvm/jdk1.7.0_79/bin/javac
  link currently points to /usr/lib/jvm/jdk1.7.0_79/bin/javac
  link javac is /usr/bin/javac
/usr/lib/jvm/jdk1.7.0_79/bin/javac - priority 100
Now run the fullowing command and select java version "1.7.0_79":
$ update-alternatives --config java
$ update-alternatives --config javac
Check if java version is ok:
$ java -version
java version "1.7.0_79"
Java(TM) SE Runtime Environment (build 1.7.0_79-b15)
Java HotSpot(TM) 64-Bit Server VM (build 24.79-b02, mixed mode)
Install Ant
Now we want to download file, change directory to wherever you want to, in following we simply download to ~:
$ cd ~
$ wget http://archive.apache.org/dist/ant/binaries/apache-ant-1.9.14-bin.tar.gz
$ tar xvfvz apache-ant-1.9.14-bin.tar.gz
$ mv apache-ant-1.9.14 /usr/local/
$ sh -c 'echo ANT_HOME=/usr/local/  >> /etc/environment'
$ ln -s /usr/local/apache-ant-1.9.14/bin/ant /usr/bin/ant
Verfiy ant version as follows:
$ ant -version
Apache Ant(TM) version 1.9.14 compiled on March 12 2019
If the above command ended as follows:
$ ant -version
Error: Could not find or load main class org.apache.tools.ant.launch.Launcher
Caused by: java.lang.ClassNotFoundException: org.apache.tools.ant.launch.Launcher
Then:
export ANT_HOME=/usr/local/apache-ant-1.9.14
Now it should be working:
$ ant -version
Apache Ant(TM) version 1.9.14 compiled on March 12 2019
installing FHoSS
Create working directories for OpenIMSCore:
$ mkdir /opt/OpenIMSCore
$ cd /opt/OpenIMSCore
Download FHoSS source code:
/opt/OpenIMSCore$ git clone https://github.com/herlesupreeth/FHoSS
Compile:
/opt/OpenIMSCore$ cd FHoSS
/opt/OpenIMSCore/FHoSS$ export JAVA_HOME="/usr/lib/jvm/jdk1.7.0_79"
/opt/OpenIMSCore/FHoSS$ export CLASSPATH="/usr/lib/jvm/jdk1.7.0_79/jre/lib/"
/opt/OpenIMSCore/FHoSS$ ant compile deploy | tee ant_compile_deploy.txt
Create configurator.sh using below script to change domain names and IP address in all configuration files:
/opt/OpenIMSCore/FHoSS$ cd deploy
in directory /opt/OpenIMSCore/FHoSS/deploy, make configurator.sh file and copy paste the follwing content to it.
#!/bin/bash

# Initialization & global vars
# if you execute this script for the second time
# you should change these variables to the latest
# domain name and ip address
DDOMAIN="open-ims\.test"
DSDOMAIN="open-ims\\\.test"
DEFAULTIP="127\.0\.0\.1"
CONFFILES=`ls *.cfg *.xml *.sql *.properties 2>/dev/null`

# Interaction
printf "Domain Name:"
read domainname
printf "IP Adress:"
read ip_address

# input domain is to be slashed for cfg regexes
slasheddomain=`echo $domainname | sed 's/\./\\\\\\\\\./g'`

  if [ $# != 0 ]
  then
  printf "changing: "
      for j in $*
      do
    sed -i -e "s/$DDOMAIN/$domainname/g" $j
    sed -i -e "s/$DSDOMAIN/$slasheddomain/g" $j
    sed -i -e "s/$DEFAULTIP/$ip_address/g" $j
    printf "$j "
      done
  echo
  else
  printf "File to change [\"all\" for everything, \"exit\" to quit]:"
  # loop
      while read filename ;
      do
        if [ "$filename" = "exit" ]
        then
        printf "exitting...\n"
        break ;

      elif [ "$filename" = "all" ]
      then
          printf "changing: "
         for i in $CONFFILES
         do
        sed -i -e "s/$DDOMAIN/$domainname/g" $i
        sed -i -e "s/$DSDOMAIN/$slasheddomain/g" $i
        sed -i -e "s/$DEFAULTIP/$ip_address/g" $i

        printf "$i "
         done
         echo
         break;

        elif [ -w $filename ]
        then
            printf "changing $filename \n"
            sed -i -e "s/$DDOMAIN/$domainname/g" $filename
            sed -i -e "s/$DSDOMAIN/$slasheddomain/g" $filename
            sed -i -e "s/$DEFAULTIP/$ip_address/g" $filename

          else
          printf "cannot access file $filename. skipping... \n"
        fi
        printf "File to Change:"
      done
  fi
Change the permission:
/opt/OpenIMSCore/FHoSS/deploy$ chmod +x configurator.sh
Run the script with:
/opt/OpenIMSCore/FHoSS/deploy$ ./configurator.sh
It will prompt you to enter Domain name and IP Adress:
Domain name is ims.mnc001.mcc001.3gppnetwork.org
IP Adress is your Private IP (172.30.75.103 for the case of this tutorial)
Now we want to change realm name in the below files from open-ims.test to ims.mnc001.mcc001.3gppnetwork.org.
To know which files contain open-ims.test, (Note that you should be in this directory: /opt/OpenIMSCore/FHoSS/deploy) do the following:
/opt/OpenIMSCore/FHoSS/deploy$ grep -r "open-ims"
(it will output files containing term 'open-ims.test')
Open the founded files with any text editor and change the term open-ims.test to ims.mnc001.mcc001.3gppnetwork.org!
Now open the file hibernate.properties and change the value of hibernate.connection.url to:
hibernate.connection.url=jdbc:mysql://127.0.0.1:3306/hss_db
Now:
/opt/OpenIMSCore/FHoSS/deploy$ cp configurator.sh ../scripts/
/opt/OpenIMSCore/FHoSS/deploy$ cd ../scripts
Again find any file containing open-ims(if there are any) and change it to ims.mnc001.mcc001.3gppnetwork.org:
/opt/OpenIMSCore/FHoSS/scripts$ grep -r "open-ims"
(it will output files containing term 'open-ims.test')
Then Run the script with:
/opt/OpenIMSCore/FHoSS/scripts$ ./configurator.sh
It will prompt you to enter Domain name and IP Adress:
Domain name is ims.mnc001.mcc001.3gppnetwork.org
IP Adress is your Private IP (172.30.75.103 for the case of this tutorial)
Again:
/opt/OpenIMSCore/FHoSS/scripts$ cp configurator.sh ../config/
/opt/OpenIMSCore/FHoSS/scripts$ cd ../config
Then:
/opt/OpenIMSCore/FHoSS/config$ ./configurator.sh
Then Run the script with:
/opt/OpenIMSCore/FHoSS/config$ ./configurator.sh
It will prompt you to enter Domain name and IP Adress:
Domain name is ims.mnc001.mcc001.3gppnetwork.org
IP Adress is your Private IP (172.30.75.103 for the case of this tutorial)
Then change any open-ims.test to ims.mnc001.mcc001.3gppnetwork.org in file located in /opt/OpenIMSCore/FHoSS/src-web/web.xml.
Prepare mysql database:
$ mysql
<mysql> drop database hss_db;
<mysql> create database hss_db;
<mysql> quit
Import database located at /opt/OpenIMSCore into hss_db:
$ cd /opt/OpenIMSCore
$ mysql -u root -p hss_db < FHoSS/scripts/hss_db.sql
$ mysql -u root -p hss_db < FHoSS/scripts/userdata.sql
Check grants for mysql access rights at first time installation:
$ mysql
# See last line in hss_db.sql:
<mysql> grant delete,insert,select,update on hss_db.* to hss@localhost identified by 'hss';
<mysql> grant delete,insert,select,update on hss_db.* to hss@'%' identified by 'hss';
Check database if domain names are o.k. in various entries and privileges
$ mysql -u hss -p
<mysql> show databases;
<mysql> use hss_db;
<mysql> select * from impu;
Prepare script-file, start HSS:
Copy startup.sh to hss.sh in root directory:
$ cp /opt/OpenIMSCore/FHoSS/deploy/startup.sh /root/hss.sh
Open file located in /root/hss.sh and add the following to hss.sh before echo Building Classpath.
cd /opt/OpenIMSCore/FHoSS/deploy
JAVA_HOME="/usr/lib/jvm/jdk1.7.0_79"
CLASSPATH="/usr/lib/jvm/jdk1.7.0_79/jre/lib/"
Start HSS using hss.sh
$ sudo -i
# ./hss.sh
check if HSS is working
Access the web-interface of HSS: http://
For My case, http://172.30.75.103:8080/hss.web.console/
user:      hssAdmin
password:  hss
Till now Installing IMS and EPC core is done. We need to have a RAN part. For RAN we use SRS. ## Installing srsRAN ### Install UHD
$ sudo apt-get -y install git swig cmake doxygen build-essential libboost-all-dev libtool libusb-1.0-0 libusb-1.0-0-dev libudev-dev libncurses5-dev libfftw3-bin libfftw3-dev libfftw3-doc libcppunit-1.14-0 libcppunit-dev libcppunit-doc ncurses-bin cpufrequtils python-numpy python-numpy-doc python-numpy-dbg python-scipy python-docutils qt4-bin-dbg qt4-default qt4-doc libqt4-dev libqt4-dev-bin python-qt4 python-qt4-dbg python-qt4-dev python-qt4-doc python-qt4-doc libqwt6abi1 libfftw3-bin libfftw3-dev libfftw3-doc ncurses-bin libncurses5 libncurses5-dev libncurses5-dbg libfontconfig1-dev libxrender-dev libpulse-dev swig g++ automake autoconf libtool python-dev libfftw3-dev libcppunit-dev libboost-all-dev libusb-dev libusb-1.0-0-dev fort77 libsdl1.2-dev python-wxgtk3.0 git libqt4-dev python-numpy ccache python-opengl libgsl-dev python-cheetah python-mako python-lxml doxygen qt4-default qt4-dev-tools libusb-1.0-0-dev libqwtplot3d-qt5-dev pyqt4-dev-tools python-qwt5-qt4 cmake git wget libxi-dev gtk2-engines-pixbuf r-base-dev python-tk liborc-0.4-0 liborc-0.4-dev libasound2-dev python-gtk2 libzmq3-dev libzmq5 python-requests python-sphinx libcomedi-dev python-zmq libqwt-dev libqwt6abi1 python-six libgps-dev libgps23 gpsd gpsd-clients python-gps python-setuptools
$ cd $HOME
~$ mkdir workarea
~/workarea$ cd workarea
~/workarea$ git clone https://github.com/EttusResearch/uhd
~/workarea$ cd uhd
~/workarea$ cd host
~/workarea/host$ mkdir build
~/workarea$ cd build
~/workarea/build$ cmake ..
~/workarea/buils$ make
~/workarea/buils$ sudo make install
~/workarea/buils$ sudo uhd_images_downloader
~/workarea/buils$ sudo ldconfig
Install srsRAN
$ sudo apt-get install build-essential cmake libfftw3-dev libmbedtls-dev libboost-program-options-dev libconfig++-dev libsctp-dev
$ cd $HOME
~$ mkdir workarea
~/workarea$ cd workarea
~/workarea$ git clone https://github.com/srsRAN/srsRAN_4G.git
~/workarea$ cd srsRAN_4G
~/workarea/srsRAN_4G$ mkdir build
~/workarea/srsRAN_4G$ cd build
~/workarea/srsRAN_4G/build$ cmake ../
~/workarea/srsRAN_4G/build$ make
~/workarea/srsRAN_4G/build$ make test
~/workarea/srsRAN_4G/build$ sudo make install
~/workarea/srsRAN_4G/build$ srsran_install_configs.sh user
This installs srsRAN 4G and also copies the default srsRAN 4G config files to ~/.config/srsran.
Installing stuff is done. Configuration remains.
Configurations
SRS (enB)
Must have in the eNB:

    Support for QoS
    Support for Dedicated radio bearer creation
    Make sure to check the DRB configuration with respect to QCI of APN accordingly (QCI 5 for ims)
config files for mentioned features are located in folder srs. Copy all the config files to ~/.config/srsran
Open5gs (EPC Core)
config files for Open5gs are located in folder open5gs. Copy all the config files to where-open5gs-is/install/etc/open5gs Note that in all of the config files there is a path starting with /home/volte/repos/open5gs/... that you should find and replace it to path you have installed open5gs (Otherwise EPC (open5gs) won’t run).
Example:
logger:
    file: path-to-open5gs/install/var/log/open5gs/pcrf.log


  - module: path-to-open5gs/install/lib/x86_64-linux-gnu/freeDiameter/dict_mip6i.fdx
NOTE:
pcrf:
Under Connet section, change the addr of the following part to your local (Private IP):
        - identity: pcscf.ims.mnc001.mcc001.3gppnetwork.org
          addr: Your Private IP (172.24.15.30 for thhis tutorial)
          port: 3871
smf:
Under p-cscf: section, change the IP of the following part to your local (Private IP):
    p-cscf:
      - Your Private IP (172.24.15.30 for thhis tutorial)
UPF:
In order to have a working UPF, Copy the following content into a script and run it (not consistent after reboot):
where-ever-you-want$ nano upf.sh
#!/bin/bash

sudo sysctl -w net.ipv4.ip_forward=1
sudo sysctl -w net.ipv6.conf.all.forwarding=1

ip tuntap add name ogstun mode tun
ip addr add 192.168.100.1/24 dev ogstun
ip addr add fd84:6aea:c36e:2b69::/48 dev ogstun
ip link set ogstun mtu 1400
ip link set ogstun up
iptables -t nat -A POSTROUTING -s 192.168.100.0/24 ! -o ogstun -j MASQUERADE
ip6tables -t nat -A POSTROUTING -s fd84:6aea:c36e:2b69::/48 ! -o ogstun -j MASQUERADE
iptables -I INPUT -i ogstun -j ACCEPT
ip6tables -I INPUT -i ogstun -j ACCEPT

ip tuntap add name ogstun2 mode tun
ip addr add 192.168.101.1/24 dev ogstun2
ip addr add fd1f:76f3:da9b:0101::/48 dev ogstun2
ip link set ogstun2 mtu 1400
ip link set ogstun2 up
iptables -t nat -A POSTROUTING -s 192.168.101.0/24 ! -o ogstun2 -j MASQUERADE
ip6tables -t nat -A POSTROUTING -s fd1f:76f3:da9b:0101::/48 ! -o ogstun2 -j MASQUERADE
iptables -I INPUT -i ogstun2 -j ACCEPT
ip6tables -I INPUT -i ogstun2 -j ACCEPT

ufw disable
IMS
PCSCF
Config files are located in: /etc/kamailio_pcscf: find and replace every IP = ‘10.4.128.21’ to your local IP in this folder. The following command finds every File containing ‘10.4.128.21’:
/etc/kamailio_pcscf$ grep -r "10.4.128.21"
...
...
ICSCF
Config files are located in: /etc/kamailio_icscf: find and replace every IP = ‘10.4.128.21’ to your local IP in this folder. The following command finds every File containing ‘10.4.128.21’:
/etc/kamailio_icscf$ grep -r "10.42.28.21"
...
...
...
SCSCF
Config files are located in: /etc/kamailio_scscf: find and replace every IP = ‘10.4.128.21’ to your local IP in this folder. The following command finds every File containing ‘10.4.128.21’:
/etc/kamailio_icscf$ grep -r "10.42.28.21"
...
...
...
Adding Users to HSS and FHoSS
Building the WebUI of Open5GS
$ sudo apt install curl
$ curl -fsSL https://deb.nodesource.com/setup_18.x | sudo -E bash -
Then:
$ nvm install 17
$ cd /path-to-open5gs/webui
$ npm ci
The WebUI runs as an npm script.
$ npm run dev
Register Subscriber Information
Connect to http://127.0.0.1:3000 and login with admin account.
Username : admin
Password : 1423
To add subscriber information, you can do WebUI operations in the
following order:

    Go to Subscriber Menu.
    Click + Button to add a new subscriber.
    Fill the IMSI, security context(K, OPc, AMF), and APN of the subscriber.
    Click SAVE Button
Assuming IMSI of the user1 as 001010123456791 and MSISDN is 0198765432100 and IMSI of the user2 as 001010123456792 and MSISDN is 0298765432100. Try calling user2 from user1 by dialing its MSISDN ie. 0298765432100.
user1:
  IMSI                                     001010123456791
  Subscriber Key (K)                       d913dac28cea9360011fc9acb25a0215
  Authentication Management Field (AMF)    8000
  USIM Type                                OPc
  Operator Key (OPc/OP)                    10d0729ae91e99cc6787b88ff9fde699

user2:
  IMSI                                     001010123456792
  Subscriber Key (K)                       e9fa28e883dd57b67dee47304fd43649
  Authentication Management Field (AMF)    8000
  USIM Type                                OPc
  Operator Key (OPc/OP)                    d281c054e3b8a5087c43b36f4a5bfe4f
USIM and UE settings
Make sure to disable SQN check in Sysmocom SIM cards using sysmo-usim-tool tool https://github.com/herlesupreeth/sysmo-usim-tool Tested with OnePlus 5 with following methods (Official Google method is the recommended method to prevent damage to phone)
- (Official Google method) - Please follow the instructions in the following link @herlesupreeth/CoIMS_Wiki to force enable VoLTE using Carrier Privileges
- (Risky method) With modfication to enable force IMS registration is a must or else UE will not even attempt to connect to P-CSCF. Need to apply the fix back after each update. https://forum.xda-developers.com/oneplus-5t/how-to/guide-volte-vowifi-german-carriers-t3817542
Add users with following APN settings in Open5GS:
(Check out my video on this: https://youtu.be/h6qKHFd41Y4)
APN Configuration:
---------------------------------------------------------------------------------------------------------------------
| APN      | Type | QCI | ARP | Capability | Vulnerablility | MBR DL/UL(Kbps)     | GBR DL/UL(Kbps) | PGW IP        |
---------------------------------------------------------------------------------------------------------------------
| internet | IPv4 | 9   | 8   | Disabled   | Disabled       | unlimited/unlimited |                 |               |
---------------------------------------------------------------------------------------------------------------------
| ims      | IPv4 | 5   | 1   | Disabled   | Disabled       | 3850/1530           |                 |               |
|          |      | 1   | 2   | Enabled    | Enabled        | 128/128             | 128/128         |               |
|          |      | 2   | 4   | Enabled    | Enabled        | 128/128             | 128/128         |               |
---------------------------------------------------------------------------------------------------------------------
Add IMS subscription use in FoHSS as follows from the Web GUI
(See my video: https://youtu.be/tMXIpUZhDgY)
Login to the HSS web console.
(http://172.30.75.103:8080/hss.web.console/)
Navigate to the User Identities page
Create the IMSU
Click IMS Subscription / Create
Enter:
Name = 001010123456791
Capabilities Set = cap_set1
Preferred S-CSCF = scsf1
Click Save

Create the IMPI and Associate the IMPI to the IMSU
Click Create & Bind new IMPI
Enter:
Identity = 001010123456791@ims.mnc001.mcc001.3gppnetwork.org
Secret Key = 8baf473f2f8fd09487cccbd7097c6862 (Ki value as in Open5GS HSS database)
Authentication Schemes - All
Default = Digest-AKAv1-MD5
AMF = 8000 (As in Open5GS HSS database)
OP = 11111111111111111111111111111111 (As in Open5GS HSS database)
SQN = 000000021090 (SQN value as in Open5GS HSS database)
Click Save

Create and Associate IMPI to IMPU
Click Create & Bind new IMPU
Enter:
Identity = sip:001010123456791@ims.mnc001.mcc001.3gppnetwork.org
Barring = Yes
Service Profile = default_sp
Charging-Info Set = default_charging_set
IMPU Type = Public_User_Identity
Click Save

Add Visited Network to IMPU
Enter:
Visited Network = ims.mnc001.mcc001.3gppnetwork.org
Click Add

Now, goto Public User Identity and create further IMPUs as following

1. tel:0198765432100

Public User Identity -IMPU-
Identity = tel:0198765432100
Service Profile = default_sp
Charging-Info Set = default_charging_set
Can Register = Yes
IMPU Type = Public_User_Identity
Click Save

Add Visited Network to IMPU
Enter:
Visited Network = ims.mnc001.mcc001.3gppnetwork.org
Click Add

Associate IMPI(s) to IMPU
IMPI Identity = 001010123456791@ims.mnc001.mcc001.3gppnetwork.org
Click Add

2. sip:0198765432100@ims.mnc001.mcc001.3gppnetwork.org

Public User Identity -IMPU-
Identity = sip:0198765432100@ims.mnc001.mcc001.3gppnetwork.org
Service Profile = default_sp
Charging-Info Set = default_charging_set
Can Register = Yes
IMPU Type = Public_User_Identity
Click Save

Add Visited Network to IMPU
Enter:
Visited Network = ims.mnc001.mcc001.3gppnetwork.org
Click Add

Associate IMPI(s) to IMPU
IMPI Identity = 001010123456791@ims.mnc001.mcc001.3gppnetwork.org
Click Add

And, finally add these IMPUs as implicit set of IMSI derived IMPU in HSS i.e sip:001010123456791@ims.mnc001.mcc001.3gppnetwork.org as follows:

1. Goto to IMPU sip:001010123456791@ims.mnc001.mcc001.3gppnetwork.org
2. In "Add IMPU(s) to Implicit-Set" section give IMPU Identity created above to be added to this IMPU
APN settings
Clear all previous APN settings (Very Important). Try to use a clean untouched phone :D
Then, create APN as follows:

    First create internet APN, APN name: internet, APN type: default –> Save APN
    Then, create ims APN, APN name: ims, APN type: ims –> Save APN

make sure MCC and MNC are set correctly.
How to run
Run Open5gs as an EPC Core
Better to use something like Tmux.
# Terminal 1
~$ path-to-open5gs/install/bin/open5gs-mmed
# Terminal 2
~$ path-to-open5gs/install/bin/open5gs-hssd
# Terminal 3
~$ path-to-open5gs/install/bin/open5gs-pcrfd
# Terminal 4
~$ path-to-open5gs/install/bin/open5gs-sgwcd
# Terminal 5
~$ path-to-open5gs/install/bin/open5gs-sgwud
# Terminal 6
~$ path-to-open5gs/install/bin/open5gs-smfd
# Terminal 7
~$ path-to-open5gs/install/bin/open5gs-upfd
Run Kamailio as an IMS Core
Better to use something like Tmux.
// Terminal 1 (Run FHoSS)
$ sudo -i
# ./hss.sh
// Terminal 2 (Run PCSCF)
~$ sudo mkdir -p /var/run/kamailio_pcscf
~$ sudo -i
~$ kamailio -f /etc/kamailio_pcscf/kamailio_pcscf.cfg -P /kamailio_pcscf.pid -DD -E -e
// Terminal 2 (Run SCSCF)
~$ sudo mkdir -p /var/run/kamailio_scscf
~$ sudo -i
~$ kamailio -f /etc/kamailio_scscf/kamailio_scscf.cfg -P /kamailio_scscf.pid -DD -E -e
// Terminal 2 (Run ICSCF)
~$ sudo mkdir -p /var/run/kamailio_icscf
~$ sudo -i
~$ kamailio -f /etc/kamailio_icscf/kamailio_icscf.cfg -P /kamailio_icscf.pid -DD -E -e
Run srseNB as an eNB
// Terminal 2 (Run The Tower)
~$ sudo srsenb
Done! Connect the phone and enjoy.
SRTP
In order to have SRTP, copy paste the config file located in the srtp file (named ‘rtp.cfg’) to /etc/kamailio_pcscf/route/ and replace it with the existing file.
In order to enable srtp on the phone, you need to change the ims profile on the UE (That is not easy).